How to Move Ants to a New Nest Properly
Moving a colony is one of the few keeper-initiated events that can genuinely set your ants back by weeks. Done well, the colony transitions in 48 hours with no impact on brood production. Done badly, the queen stops laying for a month and the workers spend their energy on stress recovery instead of growth.
This is the protocol we follow and recommend, derived from a decade of moving colonies between holding tanks, packing them for shipping, and walking customers through their first relocation.
When you should move, and when you should wait
Move when:
- The colony has outgrown the current nest (visibly crowded, brood spilling into adjacent chambers)
- The current setup has a structural problem (cracked acrylic, persistent mould, broken humidity)
- The colony has been in a test tube for more than 4 months and shows no signs of moving on its own
Wait when:
- The current setup is “just smaller than I’d like” but the colony is healthy
- The queen is currently laying heavily and brood is at sensitive developmental stages (eggs hatching, pupae about to emerge)
- It is winter for a hibernating species, never move during diapause
- You bought a new prettier formicarium and want to swap. The colony does not care about aesthetics; the move is for you, and the cost is real.
Two move types, two protocols
There are two scenarios:
- Test tube → first formicarium, the most common move, usually done in months 2-4
- Formicarium → larger formicarium, done later, typically year 1-2, when the colony outgrows its nest
The principles are the same. The execution differs slightly.
The “let them move themselves” method (preferred)
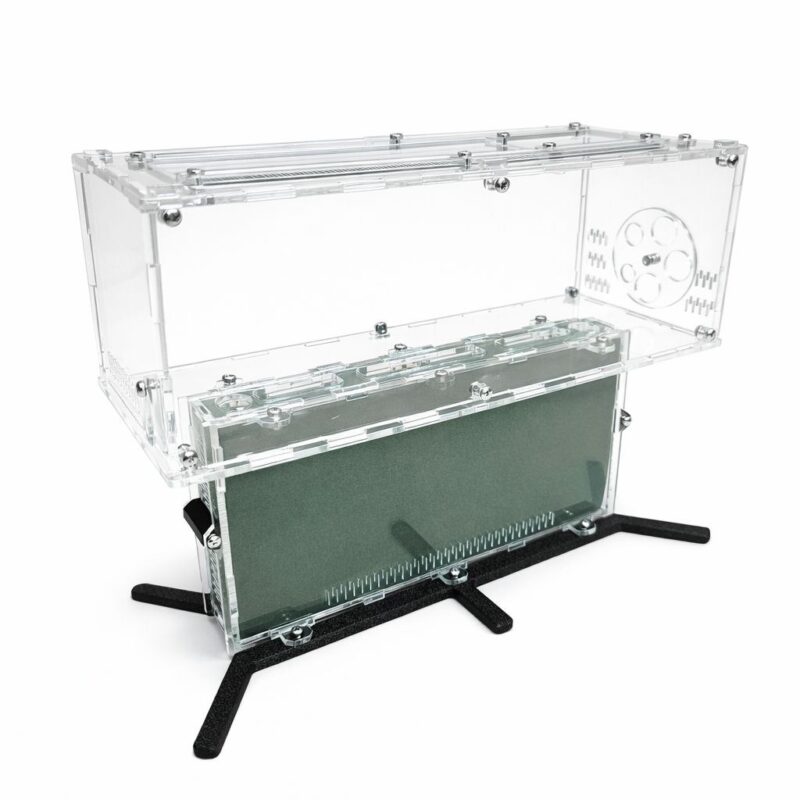
Step 1. Connect the new nest to the existing arena. If moving from a test tube, place the new formicarium’s entrance tube directly against the test tube’s opening, or run a small connecting tube between them. The two spaces must be physically linked, with no gap for escapees.
Step 2. Make the old nest unattractive. For test tubes: remove the cotton plug, expose the tube to indirect light, allow it to dry slightly. The conditions should become noticeably less inviting than the new nest. For old formicaria: cover the new nest with a dark cloth, and gently illuminate the old one.
Step 3. Make the new nest attractive. Dark, humid, slightly warmer than the rest of the setup. Most modern formicaria already meet these conditions when hydrated. Confirm with a hygrometer reading before the move.
Step 4. Wait. Workers will scout the new nest within hours. Once the queen detects the favourable conditions through worker chemistry, she signals the colony to move. The move typically completes in 12-72 hours.
Step 5. Once you confirm the queen has moved (visible in the new nest), give it 48 more hours, then disconnect and remove the old nest. Do not rush this. Stragglers always exist.
This method is low-stress and reliable. The colony moves on its own schedule.
When self-move fails, gentle force methods
Occasionally a colony refuses to move, even when the new nest is clearly better. Reasons:
- The queen has chosen to stay despite worker scouts. Her chemical signal dominates.
- The new nest’s humidity is wrong, too high (rejected as flooded) or too low (rejected as dry).
- Vibration near the new nest discourages exploration.
- The new nest material smells strongly (recently cleaned, residual chemicals).
Address the underlying cause first. If it still won’t move:
Step A. Increase the discomfort of the old nest gradually. For test tubes, this means slowly drying out the water reservoir. For formicaria, gently warming the old nest above the preferred range.
Step B. Do not flood the old nest or chill it dramatically. Sudden harsh stimuli cause panic, workers scatter, brood gets dropped, the queen can be trampled.
Step C. If after a week the queen still has not moved, try a “carry move”, gently lift the test tube or open the old nest, and transfer the queen and brood into the new nest manually. This is the highest-stress option and should be a last resort.
The carry-move protocol (last resort only)
Step 1. Prepare a clean work area on a flat surface with no ledges or open windows. Soft fabric below in case a worker escapes the tweezers.
Step 2. Use soft, flat-tipped tweezers or a small soft brush. Never use sharp metal tools.
Step 3. Move brood first, in clumps. Place gently in the new nest’s central chamber. Workers will follow the brood.
Step 4. Move the queen last. Cup her gently in a soft brush or a clean spoon, do not squeeze. Transfer her to the new nest in the chamber adjacent to where brood was placed.
Step 5. Move remaining workers. Some will follow scent trails to the new nest; you do not need to move every single worker manually.
Step 6. Close the new nest, cover with a dark cloth, do not disturb for 48 hours. The colony needs to reorganise in peace.
Expect 1-2 weeks of stopped egg-laying after a carry move. The queen takes time to re-orient and resume normal behaviour.
Post-move recovery, what to watch for
Days 1-3: low activity, workers cluster around brood, no foraging. This is normal stress recovery.
Days 4-7: scout workers leaving the nest, accepting first food, exploring the arena. Queen still in deepest chamber.
Week 2: foraging activity returns to pre-move levels. Queen may begin laying again.
Week 3-4: full normal rhythm. Brood pile grows.
If activity has not recovered by week 3, something in the new nest is wrong. Check humidity, temperature, and any new contaminant (residual cleaning product, plastic off-gassing from a brand-new formicarium).
Common mistakes
- Moving during heavy brood periods. The shock disrupts larval feeding. Schedule moves when brood is at less sensitive stages.
- Connecting the new nest with a long tube. Long connections discourage moves. Keep the bridge as short as possible.
- Forcing the move in one day. Patience is the entire technique. Give the colony time.
- Trying to clean both nests simultaneously. A move plus cleaning equals double the stress. Move first, clean later.
- Throwing away the old test tube too soon. Always wait 48-72 hours after the queen moves before disconnecting, stragglers and any laggard brood need time to join.
If you are looking to upgrade the nest, browse our formicarium range. The formicarium buyer’s guide covers which material and size fits each colony stage, and the daily care hub ties everything together.
Did you like this article?
Thanks for your feedback!